When I first started keeping sourdough starter I wasn’t sure I wanted to make bread all the time or if I’d like it that much (spoiler alert: I love it! Here’s some more info about my starter). But one of the first things I made were these sourdough pancakes and they sealed the deal; convincing me to keep a starter even if I used it for nothing but pancakes! That’s how good these are!
It’s funny, I read the recipe in a comment on a blog and I can’t even remember where. I’ve looked through so many sourdough pancake recipes and can’t find one that matches what I use. So I can’t give credit to whoever shared this with me. One thing I really like is it’s simplicity. It doesn’t require a lot of ingredients (I have it memorized by now) and is simple to throw together even if you’re not a morning person. Also I’m pretty flexible with how much starter I use, and they always turn out great.
The recipe I saw made a lot of pancakes, so I wrote down the halved recipe and it’s a really great size. I make it for myself (and have leftovers) but I think it’d be good for 2 people too.
Sourdough Pancakes
1 Cup of fed starter
1/2 t salt
1/2 t soda
1 egg
2 T sugar or honey
2 T melted butter or coconut oil
I cook mine in my cast iron skillet. I melt the butter in the skillet while I mix up the other ingredients, and I add the soda last, which helps the fluff factor! The pancakes aren’t very tangy or sour, but have a thinner, chewier texture than say, bisquick pancakes. Enjoy!
I only posted about one of the blocks I made… but I’ve been busy!
Finished quilt! I hung it on the rail of my deck, so the top 2 rows aren’t visible. It finished up at 54″ x 54″ square
I finished up 7 (and a half) other blocks, sewed them together and then quilted, bound and labeled a quilt! I only took a few pictures along the way (bad blogger!). I heard there was a prize if you’re the first to bring a finished quilt back to a participating store… so I didn’t mention it in the last post, but that was my goal. All week I’ve been watching the Row by Row facebook page and seeing people claim the prizes at the stores I visited, so I knew I had to move quickly. I wanted to wrap this up this weekend, and based on stores schedules (ahem, not open on sundays), I wanted to finish by Saturday morning. It really wasn’t much of a stretch until it came to hand-sewing the binding down. I’m not even going to mention what time I went to bed last night!
Anyway, this morning I brought the quilt to a local store (Quilted Raven, downtown Anchorage!) and claimed their prize! They were so sweet and they took my picture for their facebook page (and the Row by Row page). It was definitely a tiny mental challenge to bring in a finished quilt for people to look at (presumably people who were more accomplished and experienced quilters!). I don’t think I’ve ever put myself “out there” like that before, since usually the people looking at the quilt are my close friends/loved ones/recipients. I say “tiny” because I tried not to think about it too much and let it make me nervous– but I recognized the challenge and it felt good to breeze past it.
So now for the technical deets:
I quilted this quilt with a loose wave from side to side, using my walking foot and a blue variegated thread. The backing and binding were from my stash (woo! feels good to use what I’ve got!). I wasn’t sure how much backing fabric I had and it ended up being close to the perfect amount, so that was a happy accident. The print is from Tula Pink’s Saltwater line, which is one of my favorite designers and fabric lines (stay tuned– I’m working on a Saltwater quilt too!). The binding is a grassy green, which worked out nicely. I love a contrasting binding and this was just right!
I made the label by cutting a 6″ square and folding it in half diagonally. It was stitched down under the binding and then ladder-stitched down at the top (when I did the binding). I just used a sharpie. I’ve never labeled a quilt before (at least not by myself!) so I took the easy way. It’s funny I used that light-colored batik only to realize it looks like something I left in the bottom of my swim bag! Hopefully I always remember it’s the fabric and not stained and mildewed, haha.
Here are the stores I visited:
The left side: Quilt Zone, Anchorage and a silhouette of a mermaid I traced from a wall hanging in my house!
The right side: Seams Like Home, Anchorage and bits and pieces of Bearly Threaded, Cooper Landing
The center column, top to bottom:
Robin Place Fabrics, Soldotna
Swift Stitches, Talkeetna
Sew ‘n Bee Cozy, Seward
Sylvia’s Quilt Depot, Wasilla
Quilted Raven, Anchorage
Quilt Cache, Eagle River
I sure love shop hops! I’m looking forward to gathering more blocks (and making duplicates of the ones I’ve collected!) for wall hangings and table runners.
And I’d like to say an extra big thank you to the Quilted Raven!
Shew! Now on to the other projects (and housework) I’ve put off to get this one done!
Well… I told myself no more shop hops until I finish my existing projects… but then I decided maybe I wanted to make a Row by Row quilt.
Row by Row is a program where participating shops (across the US and Canada) each come up with a pattern for a row. Each row is a standard size (9 x 36). I think it’s a great size for wall hangings and table runners too!
The 2015 theme is water– so the blocks all have rivers, snow, fish, etc. You might not know this about me but I love all things water! I love to swim, I love the Great Lakes (and ok, oceans), I love mermaids, and even my job pertains to clean water!
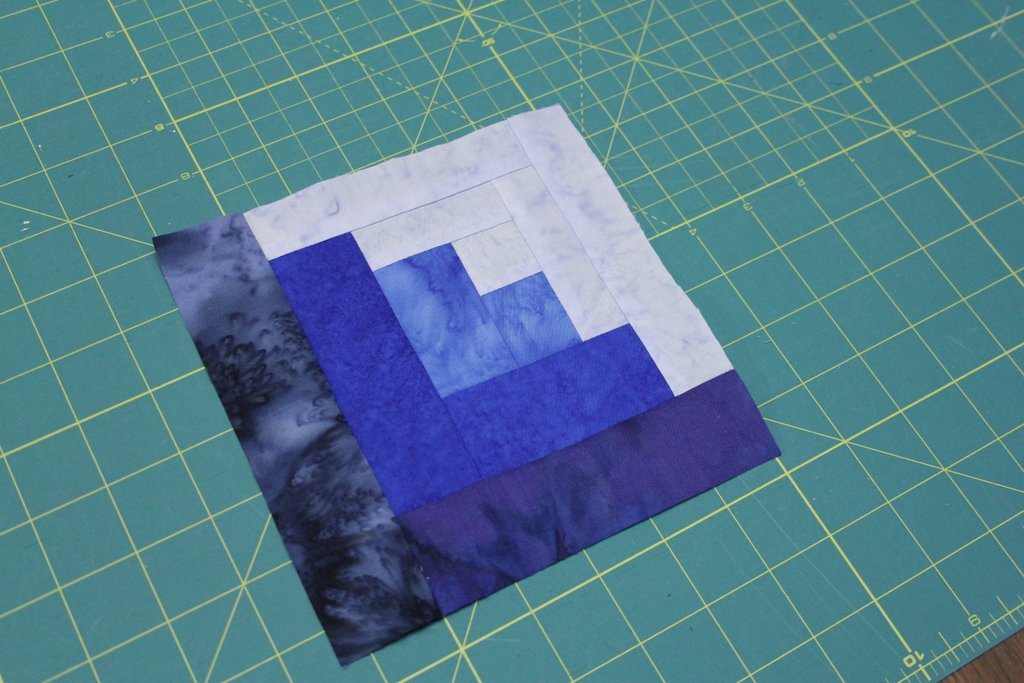
Curvy log cabin block
Here’s part of the first block I did. There are pieced blocks and applique blocks but pieced blocks are my favorite! This one is made of “curvy log cabin” blocks. There’s a ruler you can buy… but you know me and rulers/templates! I set out to figure this one out on my own. It’s called curvy because unlike a traditional log cabin block, where all the strips are the same widths, there are narrow strips and thick strips. It’s not easy to see here but it makes something pretty close to a quarter circle. So people make circles and ice cream cones and all kinds of curvy-looking things out of these blocks.
To make my own curvy block, I counted the number of strips/squares (across the middle) and then divided the finished size by that. Then, to make half of them thick and half thin, I added .25″ to half of the strips, and subtracted .25″ to half. So for this block, I counted 6 strips across. Since I wanted it to finish at 6″, that’s 1″ per strip finished or 1.5″ with seam allowances. I cut the thin strips at 1.25″ and the thick at 1.75.”
I think I did ok, but the instructions called for a 6-inch curvy log cabin block, so I made it 6″ finished… and the corners ended up getting chopped off! They must have meant 5.5″ finished, 6″ unfinished. I should have gone back and changed the setting triangles (or noticed the problem before this point), but it was a kit and I really didn’t have enough to go back. Anyway, most people won’t notice but it made me wonder if I should have gotten the ruler after all (but I have one less ruler in my stash so I’m still ok with it!).
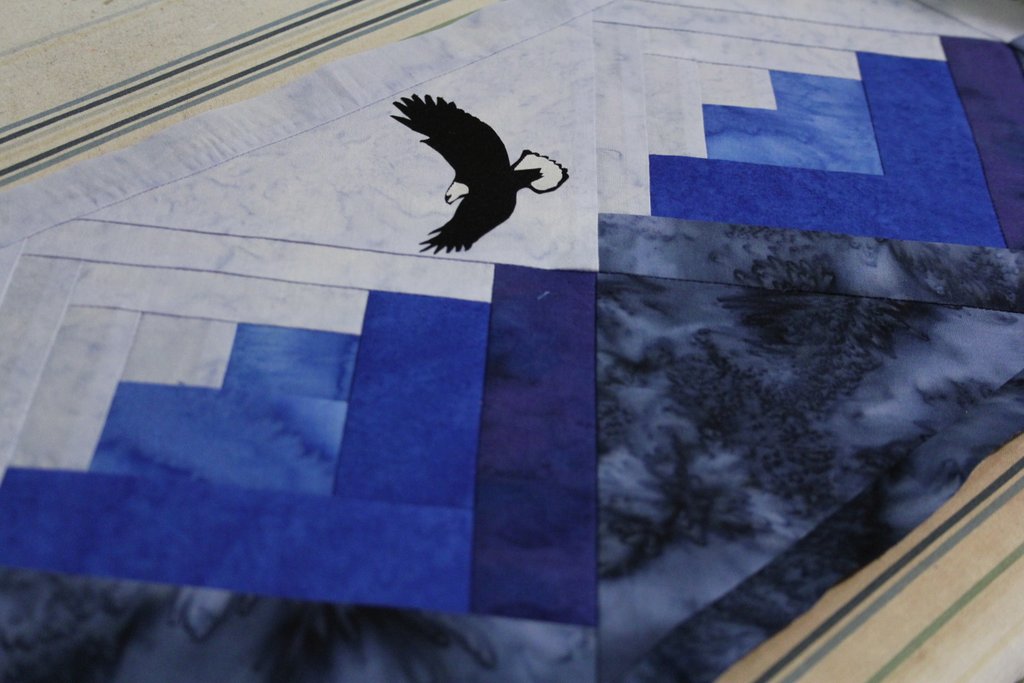
The last step was to add a bald eagle flying over the waves! I used fusible web to applique it on. You can see a cut off corner here too
Anyone else go to a coffeeshop where they write AMOO on the cup to denote almond milk? Ha. Makes me giggle every time!
I spent a long weekend visiting my brother, sister-in-law and nephew on Vancouver Island recently. They live in such a beautiful place! And my nephew is such a cutie! He was 10 months old at the time. He’s crawling and getting into everything, but it’s fun to play with him and watch him figuring out the world around him.
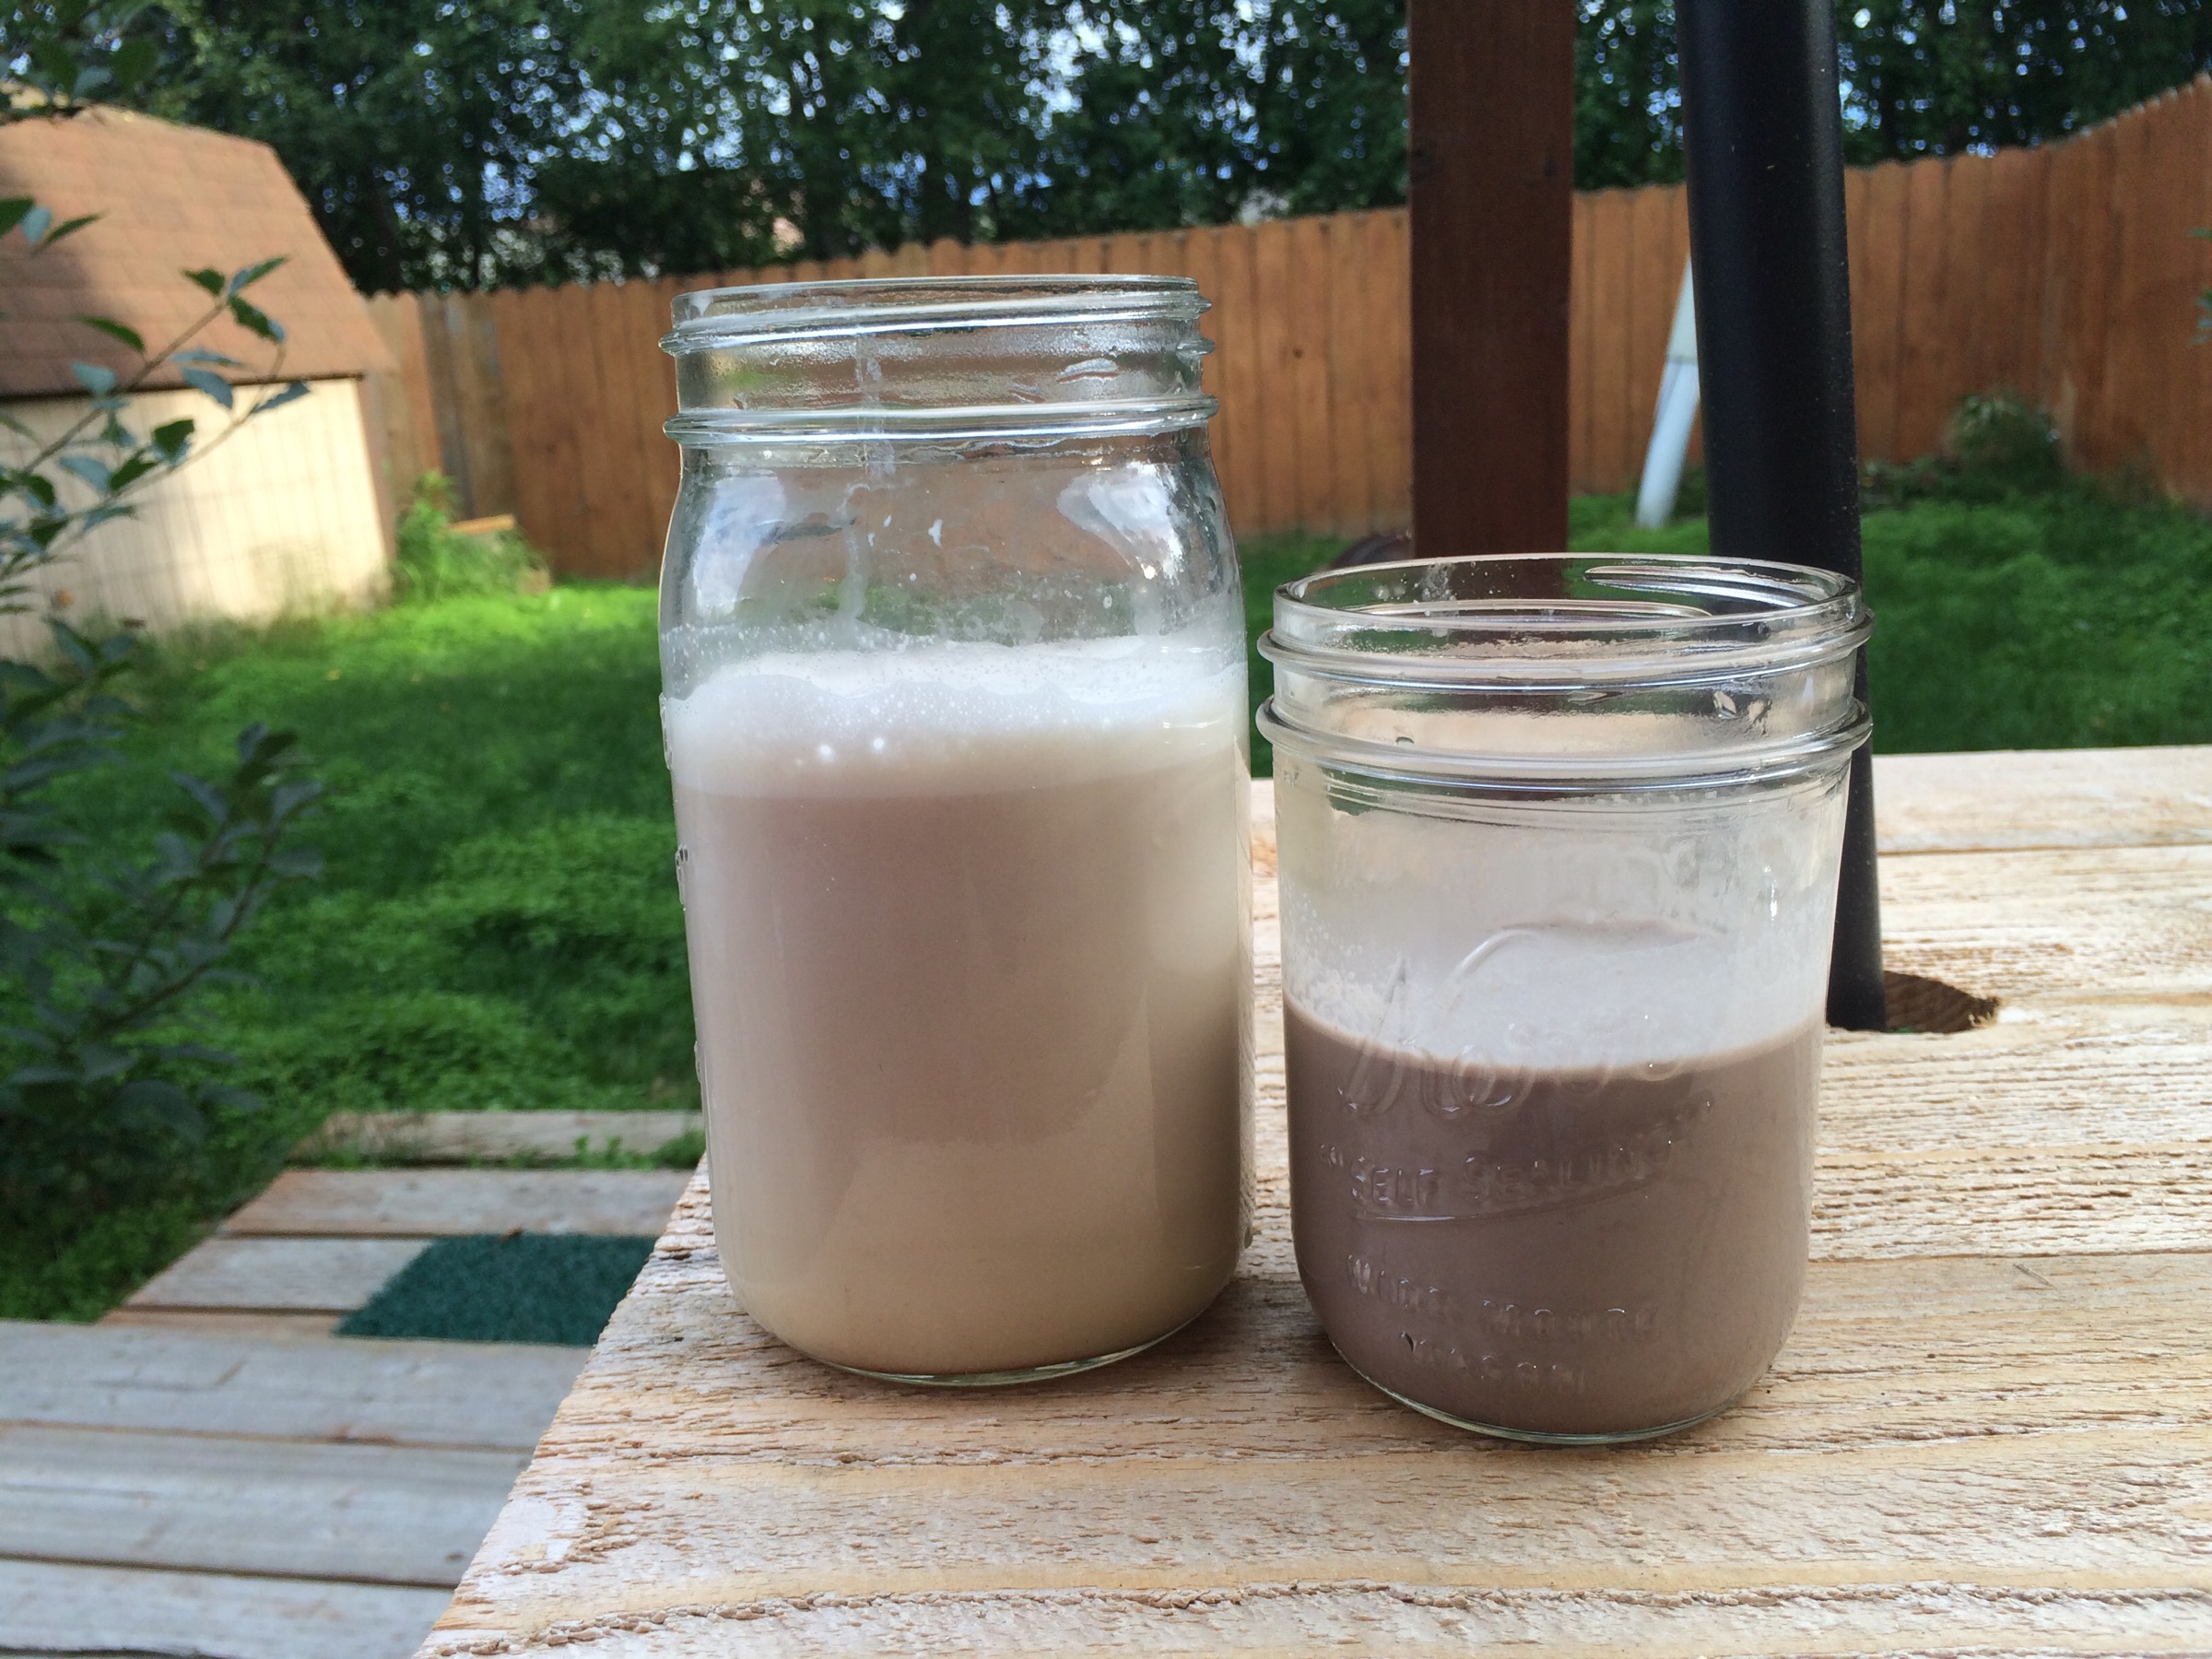
My sister-in-law, Leanne, made homemade almond milk while I was there. Sometimes when you watch someone doing something it looks easy than it is… But this is just about that easy!
Leanne introduced me to Oh She Glows by a) mentioning recipes that sound delicious (i.e. Yam Enchiladas) and b) actually cooking them when I visit! Anyway, the almond milk recipe is another from Oh She Glows. And Leanne even sent me home with a mesh bag– it’s not a nut milk bag– that’s slightly stretchy and has nice, strong seams.
I was inspired by the almond milk and tried a little hazelnut milk too (with a little cocoa!). Both milks were delicious, even though the hazelnut didn’t really taste like nutella (maybe I can keep trying!)
I’ve heard you really have to find almonds on sale to make it more cost effective than just buying almond milk. But it’s fun, easy and delicious… and you know exactly what you’ve put in it! It might save you a trip to the store if you really want a bowl of cereal the next morning! 😉